I am really not into patterns but, I do give then a shot ever once in awhile. But, clothes patterns hurt my head lol if it isn't a simply pattern like a shrug, shroat, or shrap then I will come up with my own pattern. If it is a hat, purse or something like a blanket or something then I just may follow the pattern but, if you know me then you know I will surely give up on the pattern and go my own way.
Braking News.......................................................................
Oh by the way want to give a HAPPY BIRTHDAY shout out to a blogger friend of mines Christina. HAPPY BIRTHDAY CHRISTINA, so for my readers after well going though my blog and leaving a comment please do drop Christina off a Happy Birthday at her blog. I know it will make her day.
.....................................................................................
Ok now back to my boardcast: I always have a lot of people asking me for my patterns I don't do patterns so I mainly learn by trail and error. When it came to doing wearables I couldn't find patterns that either I like or felt that it was way to much work when I can make it simply and easier for me. So I thought about how can I make a wearable but, not make it so hard for beginngers. So let me explain.
Ok lets say I want to make my daughter Nellie a shirt she is 2 years old. This is how I will go by doing that. I will get a shirt of hers that I know that fits her just right not to tight not to loose.
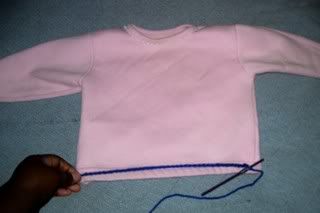
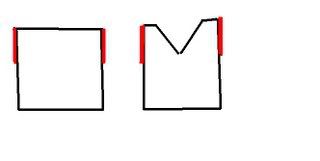
Here is the shirt here. I will chain and keep measuring the bottom of her shirt with my chain, In this case I chain 36 stitches. So I will start with 36 this is with a H hook the number to start with changes depending on your hook size. Now lets say I want to work double stitches I will just chain 3 more stitches from here.
Now from here I will figure out what pattern stitches I want to use and go with it.
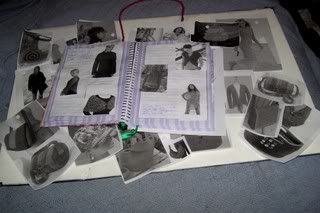
Here go a couple of drawing pictures sorry I am not a pro at the drawing on the painting.
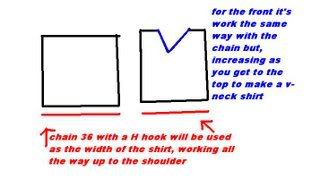
Here I will start my back and front with the same chains 36. For the front piece as I get up to the top I will start increasing to make the v-neck shirt. Increasing ever other row. I will work both sides one at a time. Increasing the same rows on both sides of the v-neck to make it even.
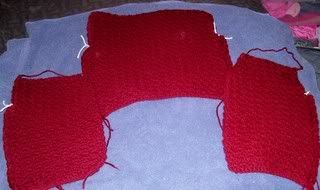
Ok now you done with both pieces front and back. The 2 pieces may just look way to small for that person you is making it for but, don't worry you is not done just yet.
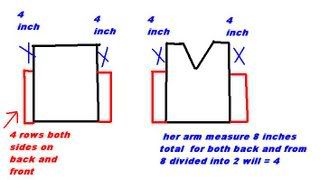
How I figure out how far to crochet up for the 4 sides. Ok I measure my daughter arm in the biggest part of her arm she is only 2 so that means it wasn't hard to figure out. 8 inches around her arm I think it really was about 7 inches and something but, I round it up a bit. So 8 total that means 4 inches each for all 4 sides.
I then will take a measureing tape and put the tape from the shoulder blade down and post it at 4 inches on all 4 sides.
Example :
Here in the picture I will use some scrap yarn to mark off that 4 inches on all 4 sides. Before starting to crochet the rows on the side you have to do this in order to get your armhole.
So lets say I want the sleeves a little wider instead of that 8 I will do 10 so that will be 5 inches on all 4 sides. So you can surely work with the arm hole as much as you like.
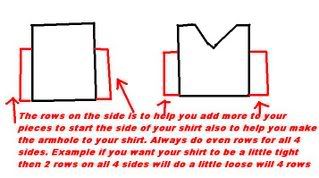
Now it's time to add a couple of rows on the sides of your shirt this helps you to create armholes at the same time. I always add even rows on all 4 sides. I will put the shirt around my daughter pinning it to see how many rows I think I will need and go from there. How I figure this out if I want a tighter shirt I will only add 2 rows each on all 4 sides now if I want more room I will add 4 rows each on all 4 sides. I will crochet starting from the bottom of the shirt working my way up to where I put that scrap piece of yarn stoping then turning and working my way back down making sure to chain before turning.
So now you have your armhole on all 4 sides and your rows on the sides. So now it's time to put your pieces together to make a shirt.
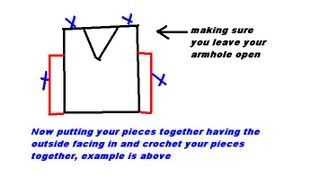
Now turning your outside pieces in making sure to crochet your shirt close on the wrong side you don't want to do it on the right side that wont look to nice. Crocheting it close is better then whip stitching it because crocheting gives it that tighten look then whip stitch and since you will be taking the shirt off and on that whip stitch will soon start to come a loose and you know you don't want to be walking down the hall in the mall and your shirt fall apart in front of the world. LOL
In the picture above crochet it close where the X's are shown making sure to NOT crochet your arm holes, neck part and bottom close. You surely will have to be able to get in the shirt wont you lol.
Now after crocheting everything you should now have this.
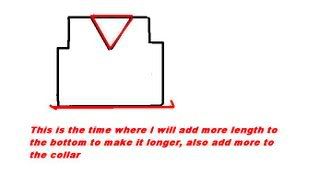
This is the time where you can add length to your shirt also hiding that foundation chain that is at the bottom of your shirt. It's your shirt make the length as long as you like. Also this is the time to go over your collar and back piece of the shirt giving it more of a clean look to it.
Ok I do the sleeves part oh so different from other crocheters. I crochet my sleeves right on to where the armhole is.
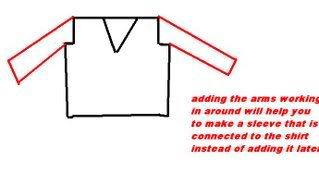
To me this gives it more a a fit, fit to the arm. Plus I didn't like how doing the arms and attaching it later looked it didn't look right to me.
I start to crocheting around the armhole starting under the armpit.
NOTE: When you is crocheting around the opening to add your sleeves make sure to keep notes on where you increase or decrease so that you can do the same on the other sleeve in the same rows.
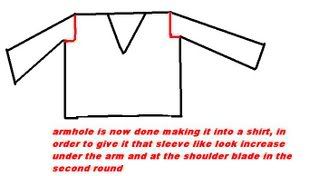
I figure out though trail and errow. The second or third row I will crochet 2 together under the arm and at the shoulder blade to give it more of a define look to the arm.
For short sleeves I will decrease by crocheting 2 together under the arm ever other row. For longer sleeves I still will do the 2 together under the arm and at the shoulder blade in the second or third row but, then I want start back increasing until I get to the elbow by decreasing ever other row. Always decreasing under the arm because if you noticed the top of your arm is much bigger then under your arm.
I will try it on me or my daughter whoever I am making it for just to make sure that the sleeves look right as I go.
Again NOTE, keep a notebook by you so you can keep track of your rows so that your other sleeve can be the same.
If you is like me I do both sleeves at the same time. Do 2 or 3 rows on one sleeve then go and do 2 or 3 more on the other sleeve working with both parts of the yarn in the skein to me it is quicker to do both at the same time.
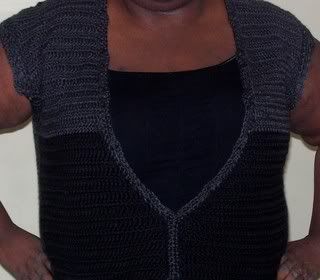
Now you have made you a sweater shirt whatever you like to call it.
There you go NO PATTERN followed just a couple of simply directions on how to do a wearable. Done this many many times and liked it a lot so I thought this would be easy for those that never done wearables but, always thought about giving it a shot.
All the shirts I done by using my simply easy directions.
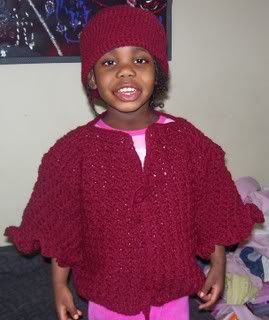
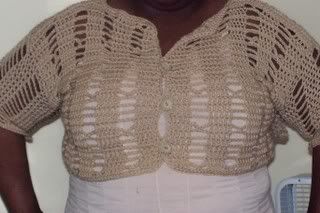
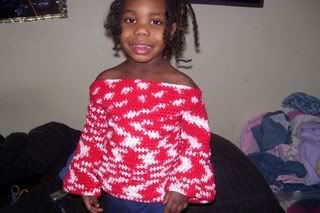
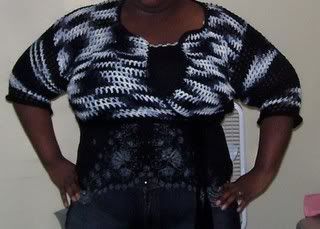
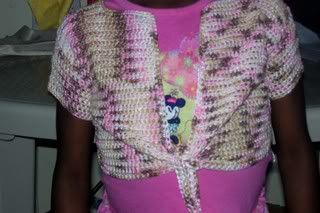
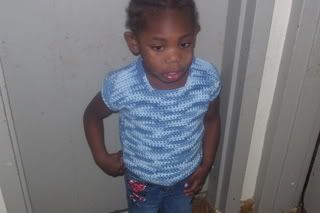
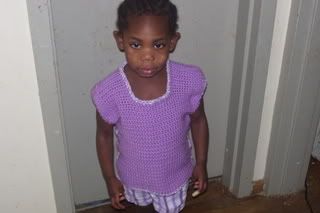
And Many Many More:)
Thanks for looking and I hoped I was able to help those that want to try a wear even if you just try something with some simply base stitches it is at least a start.
Everyone take care:)


11 comments:
If you can come up with your own designs just by looking at pics, you're very, very talented. Have you thought about getting into design?
Thanks for stopping by my blog!
Lesa, I love your work! Some of these designs are just great. :) I look forward to visiting your blog often and finding you on Ravelry and the 'Ville!
Thanks for letting me know you're here. :)
Oh, and I love the little heart cursor!
Lesa, your work is amazing. You've got a great eye for design! Thanks for the pics...that gives me a good idea on how to work! I might give this a try with a sweater for Pi.
And thanks for the birthday shout-out! You rock!!
Thanks ladies for the great comments.
Also Del I have surely thought about design but, I am oh so not a good drawer I am more of I see it I imagine it and make note of how I will do it then I go for it type of gal. But, thanks anyway for the great comment.:)
What a great post. I love dropping by and seeing your lovely work. Keep it up and hopefully see you around on the ville.
I love your work, it's lovely! I feel the same way about inspiration. I have tons of photos, pattern books, leaflets and patterns on paper. I've only actually followed a few, and even if I do, I change things around. I'm going to make a shrug and top for myself after the holidays, and am using pretty much the same technique as you. I love being able to make something without a pattern. It's freeing! :-)
Thank you so much for your kind comment on my blog by the way. You're really sweet! Happy crocheting!
Wow! What a great post! I need to hang an inspiration board. I think it'd be fun to see all the time. Your design techniques are great. I think I and probably a lot of people get hung up on the technicalities. Just go for it, right? Your things always turn out great!
Thanks for your comment on my blog! Awesome and informative post! :)
Hi Lesa, great post, lots of info here!
naida
Lesa, thank you for a great tutorial! You have some fantastic designs!!! You should really get into designing too.
Krystal
fuzzyferret.blogdrive.com
Those are some great tips! Thanks. One day, just maybe, I will try a wearable out some time.
Post a Comment